
WordPress Toolkit
Learn about WordPress Toolkit and how to manage it.
1. What is WordPress Toolkit?
WordPress Toolkit is a CMS tool integrated into web hosting environments such as Webhosting Control Panel (WCP) and Plesk that simplifies the management of WordPress websites.
Main Features
Function
Description
Installation
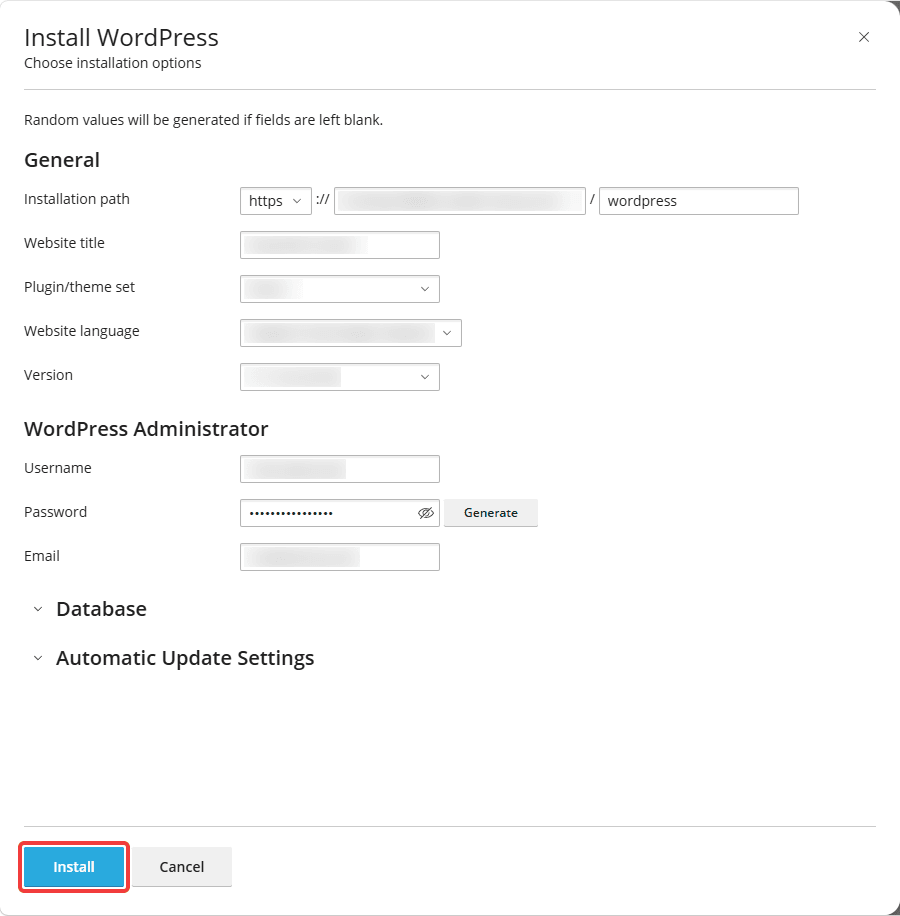
WordPress can be installed with just a few clicks instead of a manual setup, including the selection of the installation path and configuration of automatic update settings.
Updates
Updates for WordPress itself, plugins and themes can be managed centrally from a single view rather than maintaining each installation individually.
Security
The toolkit scans pages for known security vulnerabilities and allows you to fix them.
Managing Plugins and Themes
Installed plugins and themes are displayed with their version numbers and can be activated or deactivated. This is useful if a faulty plugin causes the site to stop working and you can no longer log in.
Cloning
You can create an exact copy of the live site and test changes in a secure environment before they go live without using maintenance mode.
Backup
You can create and manage backups using the Toolkit. Please note that restoring a backup will cause the current state of the site to be lost.
2. Installing WordPress Toolkit
- Log in to the Customer Control Panel (CCP).
- Go to the Products menu item on the left.
- Select the web hosting product you want.
- Click the magnifying glass icon to the left of the product you want.
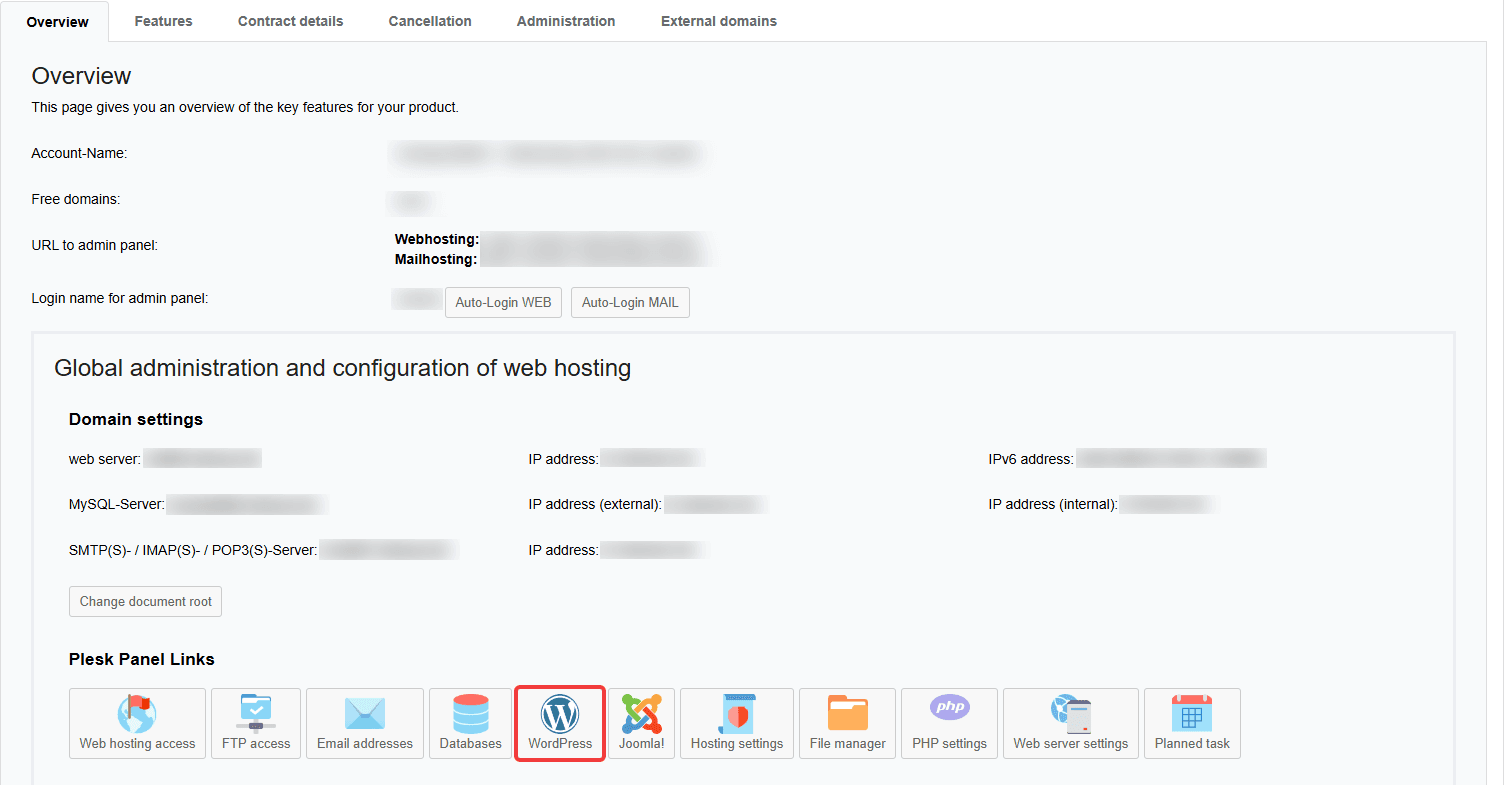
- In the Overview tab, click the WordPress button at the bottom.
6. Then, you can install WordPress in WCP by filling out the required fields, configuring your preferred settings and clicking Install in the lower-left corner.
3. Managing WordPress Toolkit
- Log in to the Customer Control Panel (CCP).
- Go to the Products menu item on the left.
- Select the product you want.
- Click the magnifying glass icon to the left of the product you want.
- For web hosting products, proceed as follows: On the Overview tab, click the Auto-Login WEB button under Login name for admin panel. For reseller web hosting and managed private server products (both using Plesk), proceed as follows: On the Overview tab, click the displayed URL under URL to admin panel. Then, log in to Plesk using your login credentials.
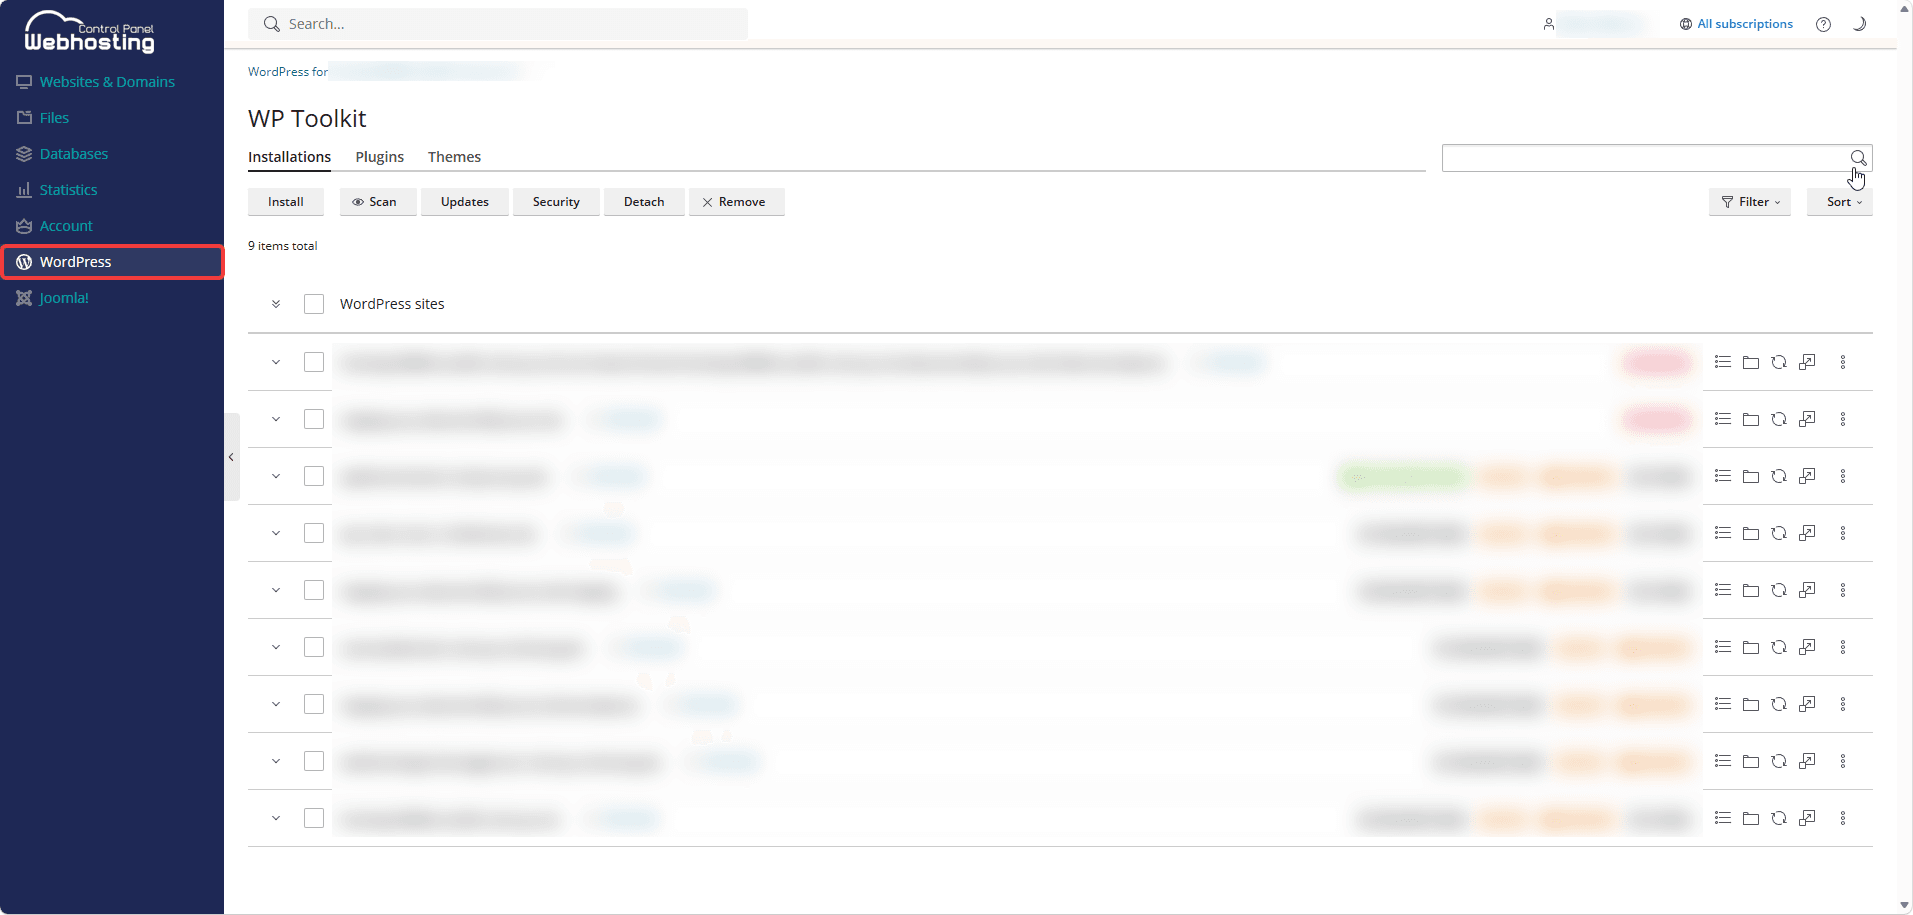
- Click the WordPress menu item on the left.
Please note that the tabs and buttons in the WordPress menu item vary depending on the selected product. The following screenshots show the WCP user interface. The Plesk user interface also includes the Packages tab.
Installations
On the Installations tab, you'll see your WordPress websites which you can filter and sort using the corresponding buttons on the right as well as the search bar.
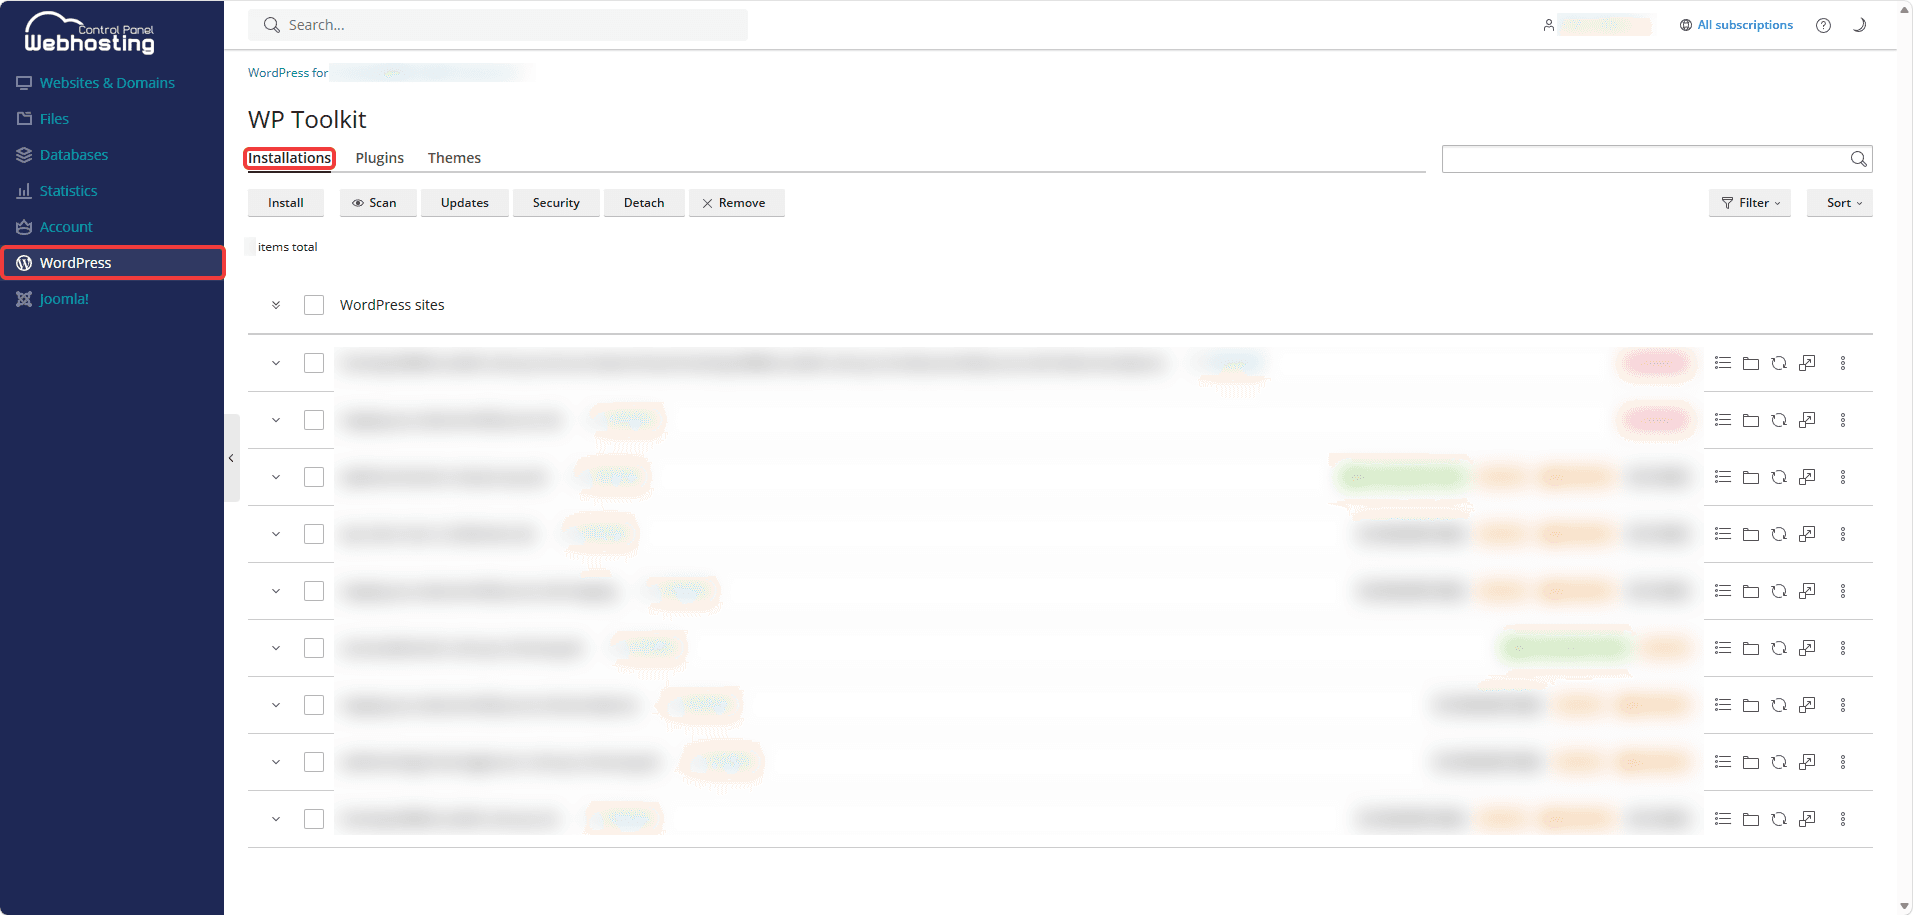
You'll also see the following buttons:
Install
This allows you to install new WordPress websites. To do so, configure your desired settings and then click the Install button in the lower-left corner.
Scan
This allows you to scan the file system for WordPress installations. A progress bar will appear in the lower-right corner.
Updates
This allows you to check for updates for WordPress websites. To do so, check the box next to the desired WordPress websites and click Update in the upper-left corner. You can also use the corresponding buttons to change settings, check for updates, apply filters and use the search bar on the right.
Security
Please note that the Security button is only available for web hosting and reseller web hosting products.
Be sure to create a backup before every installation. Not all security settings can be undone.
This allows you to check the security of your WordPress websites. Here, you’ll see the top security risk, available updates and practical security measures.
On the Sites tab, you can check the boxes next to the desired WordPress websites, install and filter updates and use the search bar on the right.
On the Vulnerable Components tab, you can see the security risk for the affected WordPress website.
On the Security Measures tab, you can check the boxes next to the desired WordPress websites to secure them, check their security and revert their security measures. You can also filter them and use the search bar on the right.
Detach
This allows you to detach WordPress websites. To do so, first check the box next to the desired WordPress sites.
To add back WordPress sites that were previously detached, proceed as follows:
- Go to the Websites & Domains menu item.
- Click the domain you want.
- On the Dashboard tab, click Files under Files & Databases.
- In the home directory, click the "httpdocs" folder.
- Delete the "wp-toolkit-ignore" file. Then, the previously detached WordPress website can be found using the search field in the WordPress menu item.
Remove
This allows you to remove WordPress websites. To do so, first check the box next to the WordPress websites you want to remove.
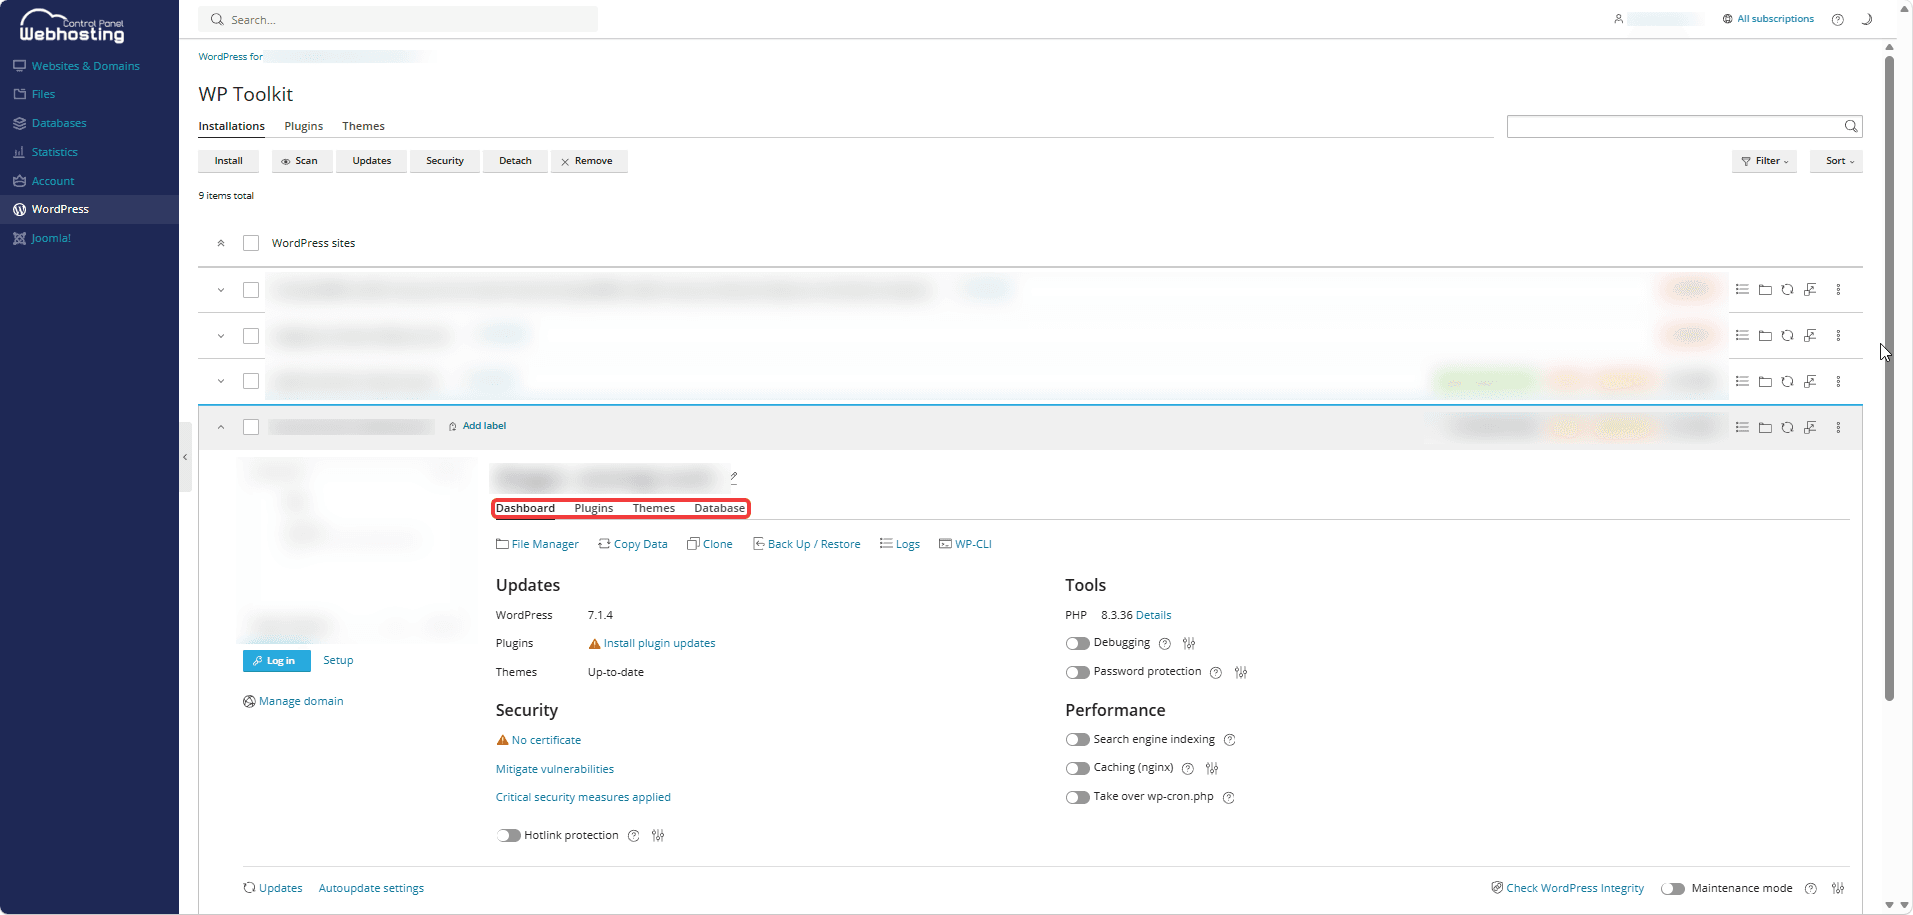
For each of your WordPress websites, you'll find the Dashboard, Plugins, Themes and Database tabs.
Dashboard
On the Dashboard tab, you'll see information about your WordPress website under Updates, Tools, Security and Performance. You'll also have access to the options File Manager, Copy Data, Clone, Back Up / Restore, Logs and WP-CLI.
File Manager
This allows you to manage your files.
Copy Data
This allows you to copy data from your WordPress website. To do so, select the target location, the data to be copied and the database tables. Optionally, you can create a restore point. Then, click Start in the lower-left corner.
Clone
This allows you to clone your WordPress website. To do so, create a subdomain for the target location or use an existing domain. Then, enter a database name and click Start in the lower-left corner.
Back Up / Restore
This allows you to create a backup of your WordPress website. You can also refresh or delete it here.
Logs
This allows you to see the logs for your WordPress website. You can also use the slider in the upper-left corner to activate real-time updates or refresh manually. In the upper-right corner, you can download the logs and optionally enable log rotation.
WP-CLI
This allows you to use the WordPress command line to perform various actions. WP-CLI commands executed here directly affect your WordPress website and bypass the WP Toolkit user interface.
Please note that WP-CLI is intended for experienced developers. Be careful not to damage your WordPress website.
Plugins
On the Plugins tab, you can install and remove plugins.
Themes
On the Themes tab, you can install and remove themes.
Database
On the Database tab, you'll see information about your WordPress website's database.
WordPress Integrity
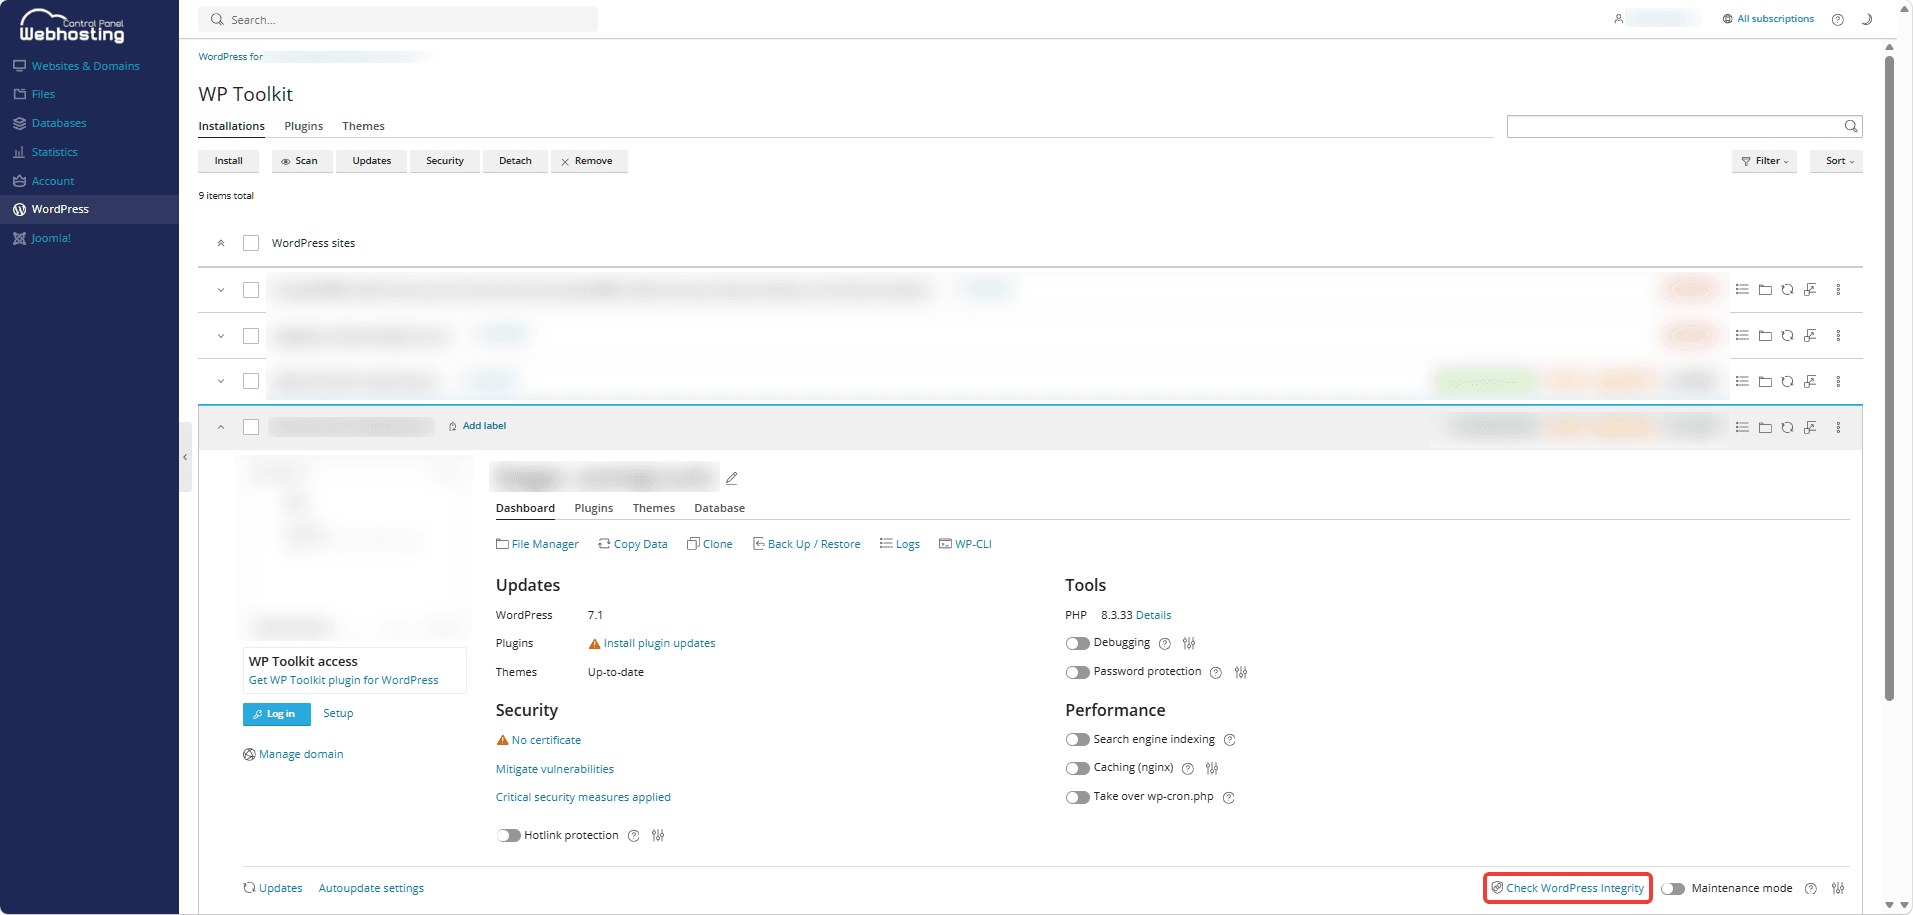
If you suspect that one of your WordPress websites is infected with malware, you can check the integrity of the WordPress core files by clicking Check WordPress Integrity in the lower-right corner. Then, click Verify Checksums to compare the core files with their reference checksums from https://wordpress.org/. If there are any discrepancies, you can reinstall the WordPress core files by clicking Reinstall WordPress Core. The reinstallation will not affect the content of your WordPress website.
Debugging
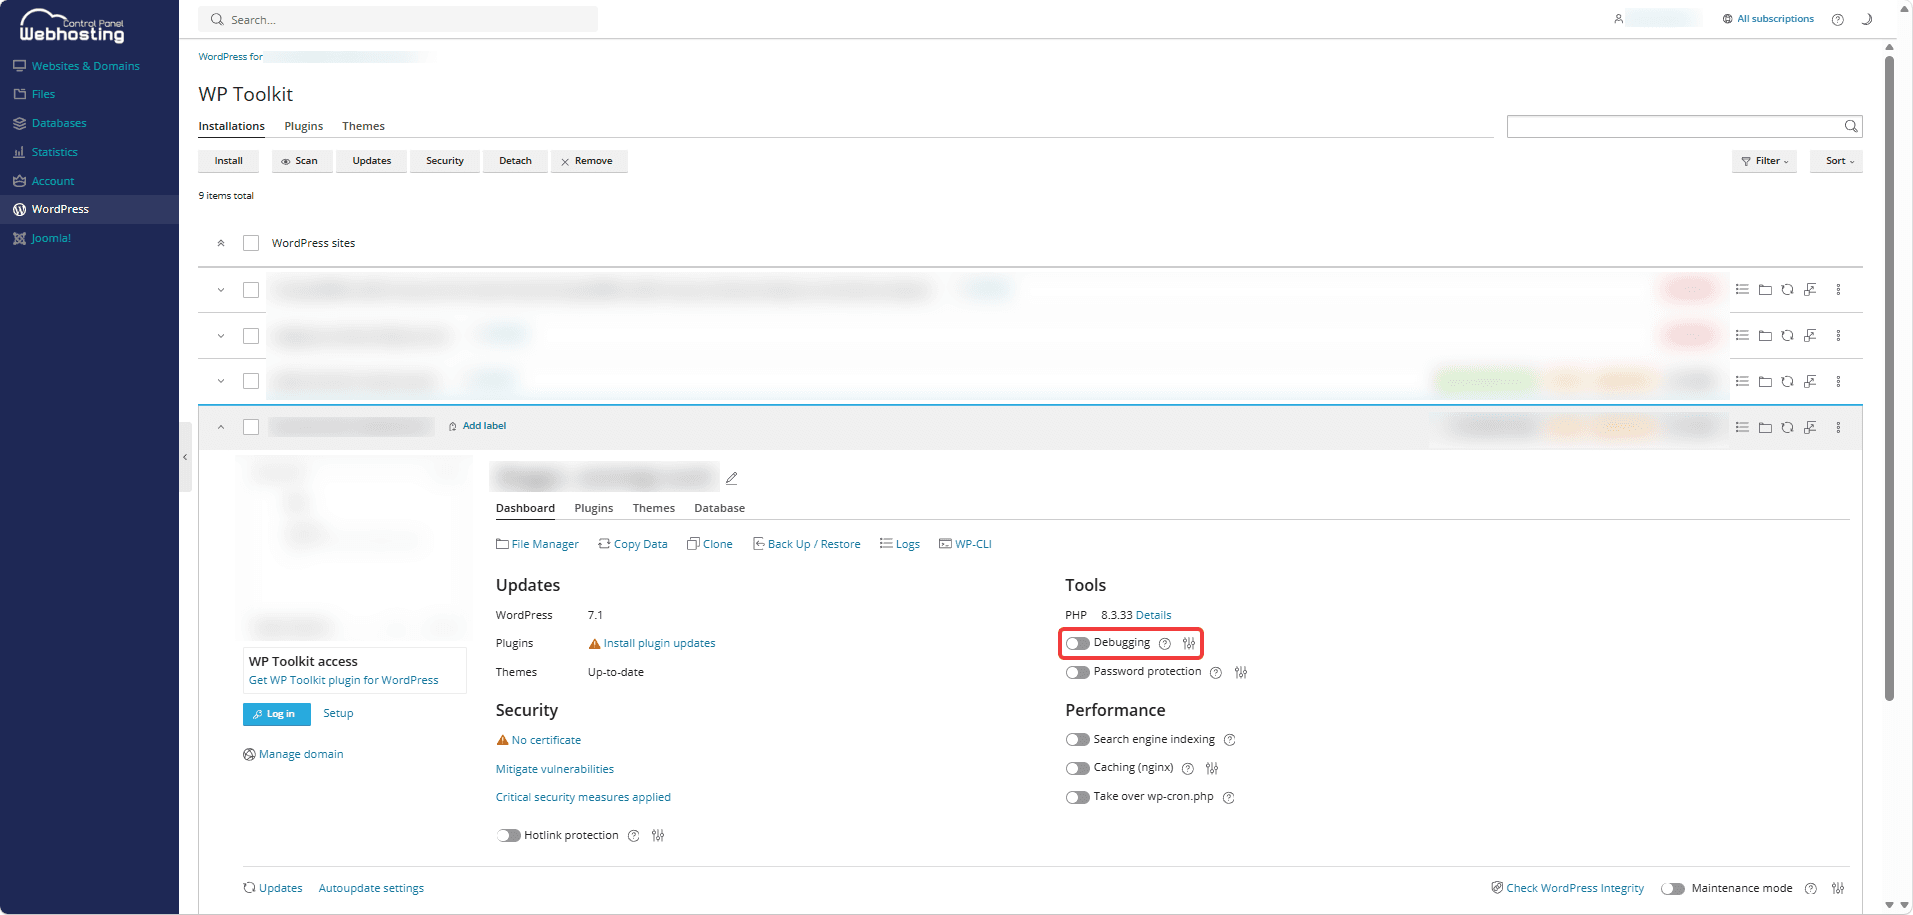
Activate the slider to the left of Debugging to enable debug mode. Debugging is turned off by default but can be used for developer and test installations. Click the slider icon to the right of the question mark icon to open the debug settings. Configure your desired settings here and click Save in the lower-left corner.
Quarantine
If WordPress Toolkit detects a suspicious installation, you'll receive a notification that the affected installation is being quarantined. This can happen if the WordPress website doesn't respond within the 60-second timeout (false positive).
The fact that the WordPress website is in quarantine does not mean that it is actually infected with malware. It remains online, but automatic updates are paused.
To check whether this is an actual malware infection or a false positive, run a malware scan on the affected WordPress website using the corresponding button.
If there is no malware infection, you can remove the WordPress website from quarantine by clicking the refresh button.

If there is a malware infection, proceed as follows:
- Create a complete backup of your files and database. For more information, see Creating Manual Backups.
- Change passwords for FTP, Plesk and WordPress users.
- Delete any unknown email or user accounts.
- Check wp-config.php and the root directory for suspicious PHP files with cryptic names and tampered code.
- Delete /wp-admin/, /wp-includes/ as well as the root PHP files and replace them with fresh, official WordPress files.
- Check the WordPress Integrity.
- Keep WordPress, plugins and themes up to date. If you're unsure, consult a security expert and only then lift the quarantine status of the WordPress website using the refresh button.
Plugins
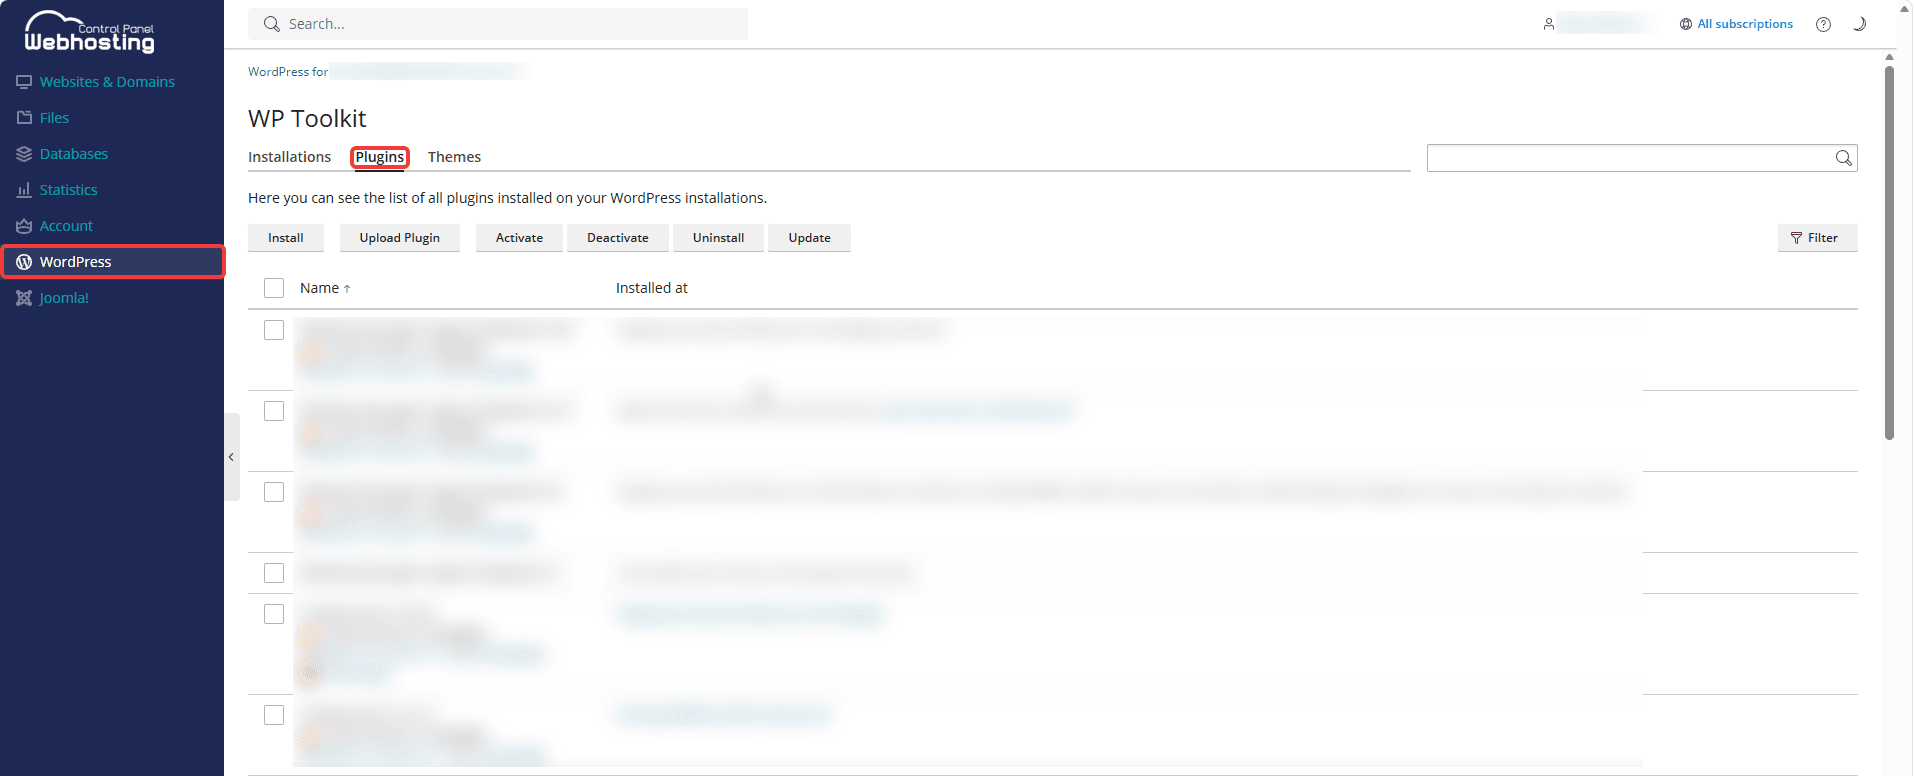
On the Plugins tab, you'll see the plugins installed on your WordPress websites as well as the following buttons:
Install
This allows you to install new plugins for the selected WordPress websites. Please note that each plugin is installed only once.
- Enter at least 3 characters for the plugin name in the search field.
- Check the box next to the plugins you want and click Select websites in the lower-left corner.
- Check the box next to the WordPress websites where you want to install plugins. Optionally, you can check the box next to Activate after installation.
- Click Install in the lower-left corner.
Upload Plugin
This allows you to upload plugins.
- Select the plugin you want. Note that it must be a ZIP file.
- Check the box next to the WordPress websites you want. Optionally, you can check the box next to Activate after installation.
- Click Save in the lower-left corner.
Activate
This allows you to activate plugins. To do so, first check the box next to the plugins you want to activate.
Deactivate
This allows you to deactivate plugins. To do so, first check the box next to the plugins you want to deactivate.
Uninstall
This allows you to uninstall plugins. To do so, first check the box next to the plugins you want to uninstall.
Update
This allows you to update plugins. To do so, first check the box next to the plugins you want to update.
You can also use the corresponding button on the right to filter your plugins.
Themes
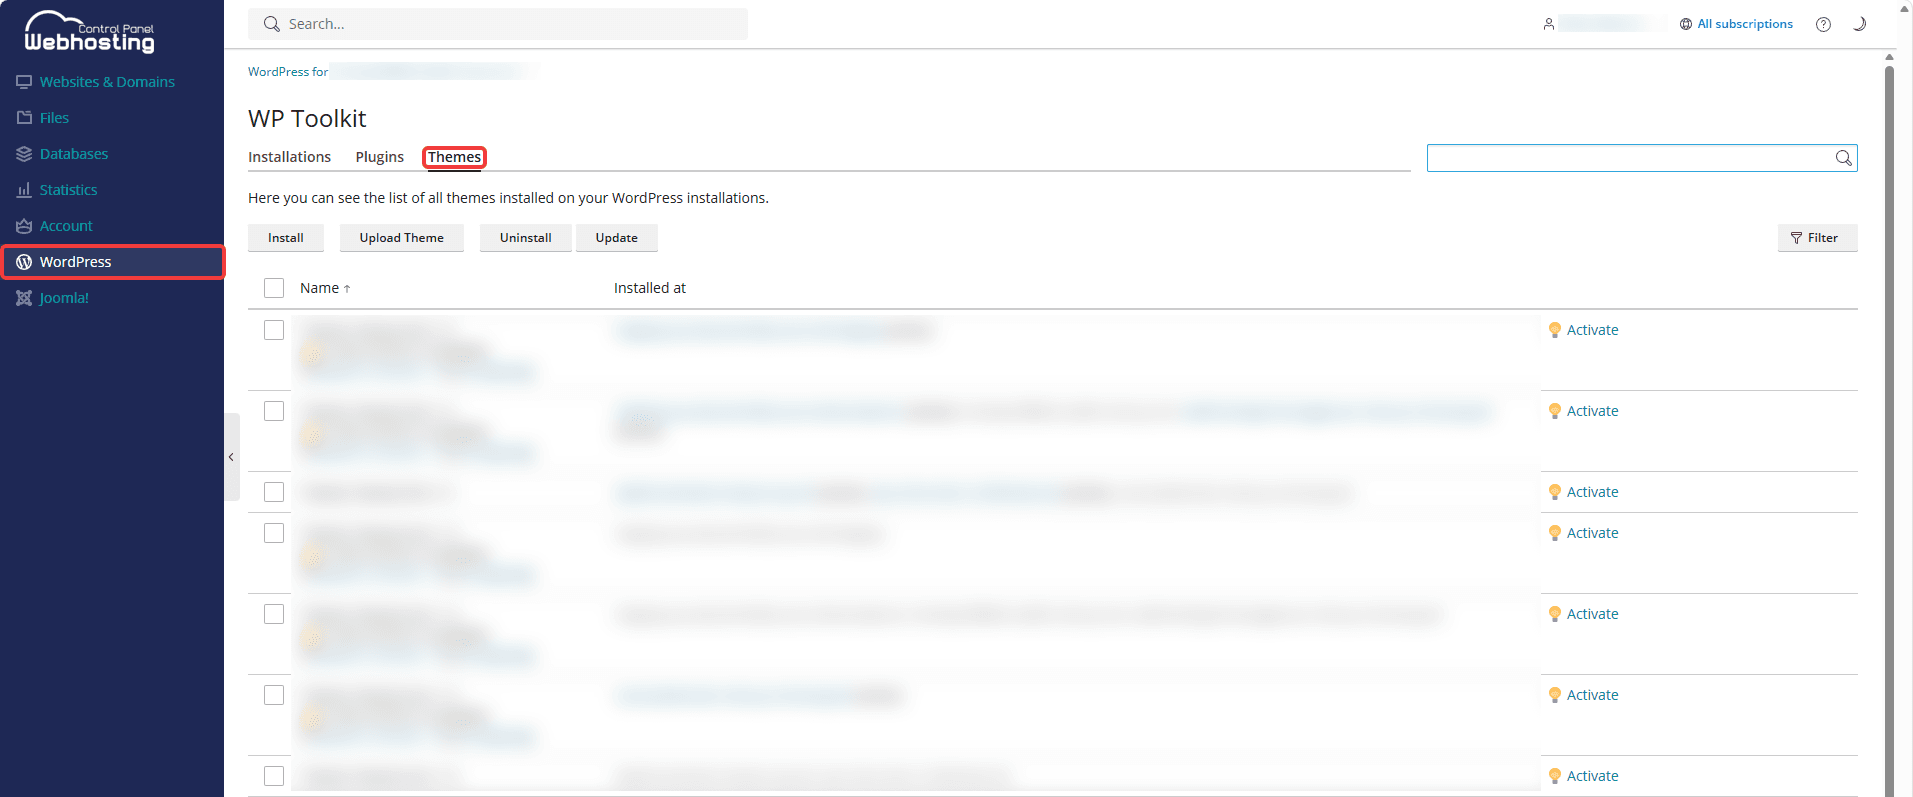
On the Themes tab, you'll see the themes installed on your WordPress websites as well as the following buttons:
Install
This allows you to install new themes for the selected WordPress websites. Please note that each theme is installed only once.
- Enter at least 3 characters for the plugin name in the search field.
- Check the box next to the themes you want and click Select websites in the lower-left corner.
- Check the box next to the WordPress websites where you want to install themes.
- Click Install in the lower-left corner.
Upload Theme
This allows you to upload themes.
- Select the theme you want. Note that it must be a ZIP file.
- Check the box next to the WordPress websites you want. Optionally, you can check the box next to Activate after installation.
- Click Save in the lower-left corner.
Uninstall
This allows you to uninstall themes. To do so, first check the box next to the themes you want to uninstall.
Update
This allows you to update themes. To do so, first check the box next to the themes you want to update.
You can also use the button on the right to filter your themes and activate individual themes using the corresponding button.
Packages
Please note that the Packages tab is only available for managed private server and reseller web hosting products (in Plesk respectively).
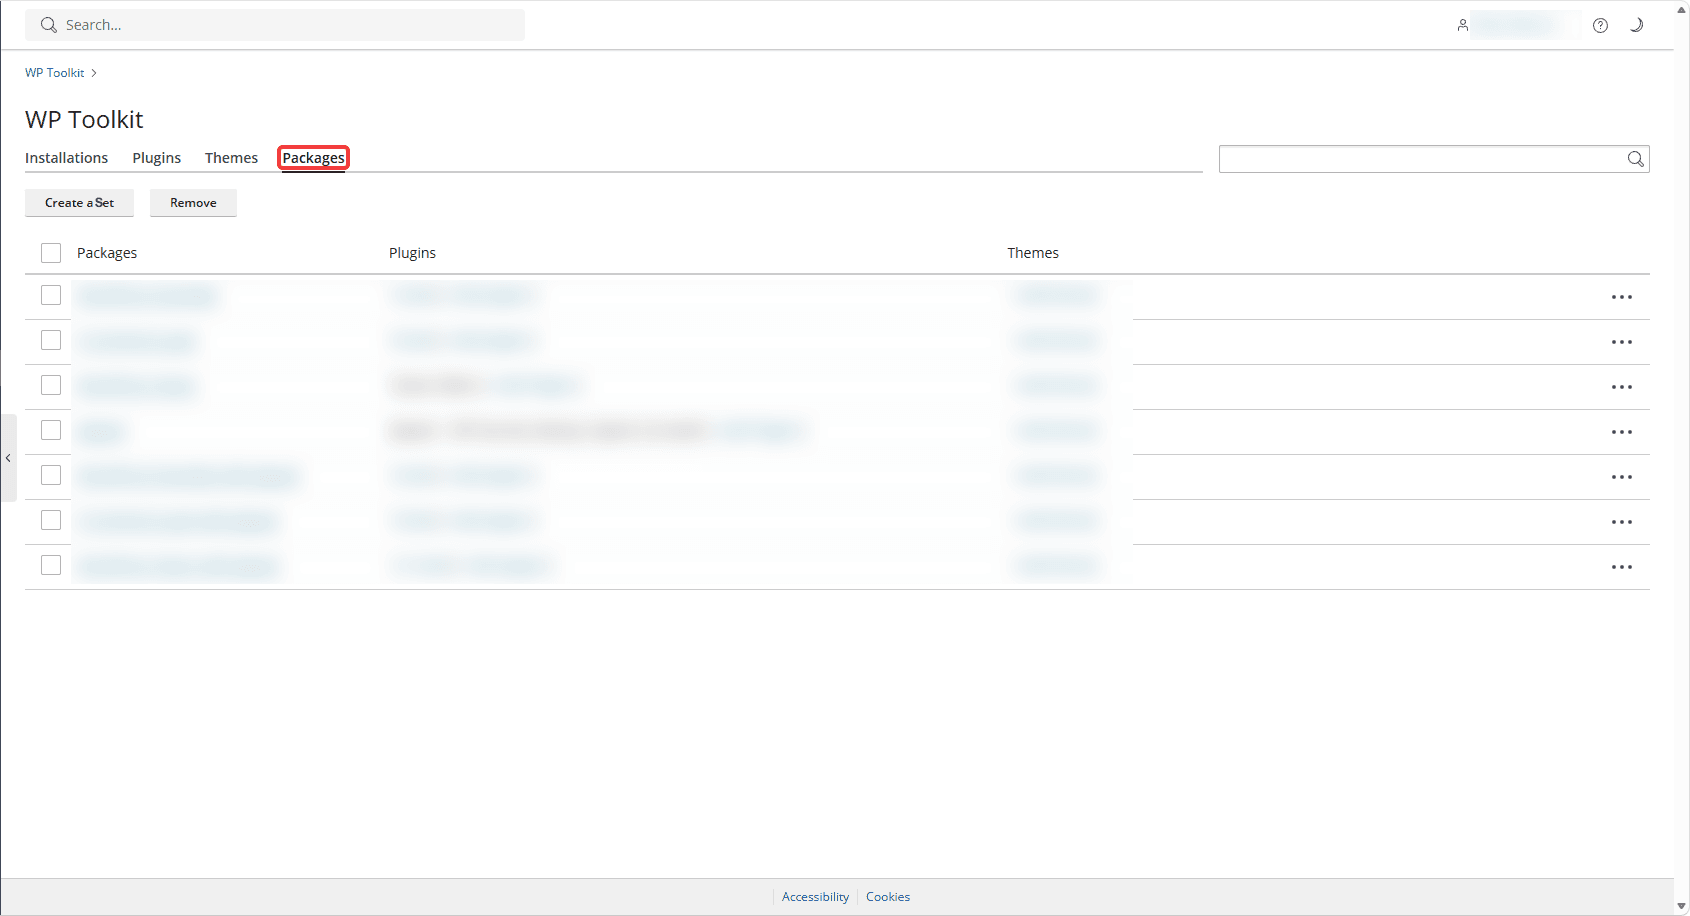
On the Packages tab, you'll see a list of the packages you've created. A package is a template that contains multiple plugins and themes. When configuring your hosting package, you can choose which package should be installed along with WordPress when you create the subscription.
Create a Set
This allows you to create a set by entering a name in the field provided and clicking Create in the lower-left corner. You can then add plugins and themes using the corresponding buttons.
Remove
This allows you to remove packages. To do so, first check the box next to the package you want to remove.
Click the three-dot icon to the right of each package to remove all plugins and the set.